Are you looking to illuminate your space effectively? Understanding how to mount LED batten lights on a concrete ceiling can transform your home or workspace. This process may seem daunting, but with the right approach and tools, it can be straightforward.
Proper lighting enhances ambiance and functionality. It’s essential to ensure you have the best fixtures for your needs. Mounting LED batten lights on a concrete ceiling requires planning and execution. You must select the appropriate screws and anchors. Precision in measurements is crucial; a small mistake can lead to significant issues later.
Many people face challenges during installation. It’s common to encounter concrete that is harder than expected. Ensure your drill is powerful enough. Pre-drilling holes can prevent damage to both the lights and the ceiling. Reflecting on your experience will help you improve future installations. Remember, practice makes perfect. With careful attention, you can become confident in how to mount LED batten lights on a concrete ceiling efficiently.
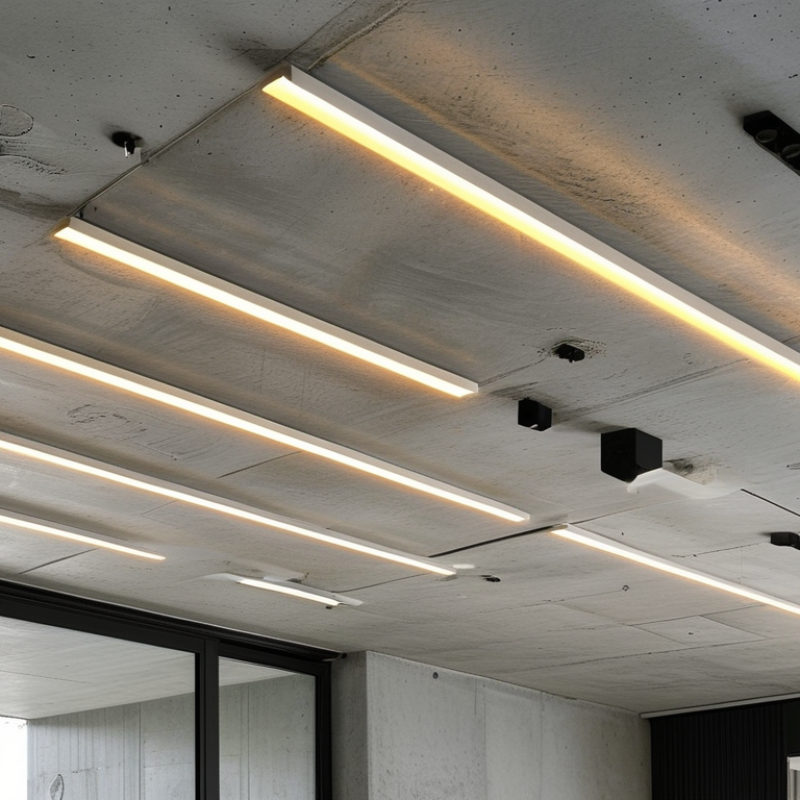
When choosing LED batten lights for concrete ceilings, understanding your space is key. Assess the area size and lighting needs before making a decision. Opt for energy-efficient models that provide sufficient brightness without overwhelming glare. Look for options with adjustable brightness settings to create a versatile environment.
Compatibility with your ceiling type is also crucial. Some lights require specific mounting brackets or clips. Ensure the chosen lights can securely attach to a concrete surface. Consider the installation process; some batten lights are more accessible than others. Consult the installation manual for guidance and potential pitfalls.
Aesthetics matter, too. Some LED batten lights offer sleek designs that enhance your space. However, don’t overlook functionality for style. It’s about finding a balance that suits your space. Always think about future maintainability. Heavy fixtures can be tricky to handle. Lastly, remember to evaluate the warranty options available. Choosing reliable products ensures long-term satisfaction.
When planning to install LED batten lights on a concrete ceiling, having the right tools and materials is essential. Gather a drill, concrete screws, anchors, a measuring tape, and a level. Use a pencil to mark where the lights will go. An electric screwdriver can speed up the fastening process.
Consider using a stud finder if you want added support. This can help locate any concrete beams nearby. Make sure you have a proper safety helmet and goggles. They protect you from debris while drilling.
Tip: Before installation, practice drilling on a scrap piece of concrete. This helps gauge the drill speed and pressure needed. Test the lights with a simple connection first. It is a good idea to ensure they work properly before final installation. Remember, precise measurements are crucial. One small mistake can lead to repositioning later. Stay focused and double-check your placements.
Mounting LED batten lights on a concrete ceiling can be a straightforward process with the right preparation. The first step is ensuring that the concrete surface is clean and free of any debris. Studies show that improper surface preparation can lead to 25% of installation failures. Cleaning should involve using a wire brush or grinder to remove dust and any loose particles. A clean surface enhances adhesive bonding, which is crucial for the longevity of the lights.
Next, you may want to repair any cracks or imperfections in the concrete. Utilizing a high-quality concrete patch will improve not just aesthetics, but also durability. According to industry reports, a well-prepared surface can extend the lifespan of lighting fixtures by 30%. Take time to fill in cracks, ensuring a smooth installation area. Once the surface is prepped, consider using appropriate anchors or fasteners specifically designed for concrete to secure the lights effectively.
Tips: Always wear safety goggles when working with concrete dust. Take breaks to assess your work to avoid missing critical spots. Also, ensure that the area is well-ventilated; dust can irritate eyes and lungs. By focusing on these details, you can achieve a professional finish while ensuring safety during installation.
| Step | Description | Tools Needed | Time Required |
|---|---|---|---|
| 1 | Gather all necessary materials and tools. | Drill, screws, LED batten light, measuring tape | 10 minutes |
| 2 | Measure and mark the location where the lights will be mounted. | Measuring tape, pencil | 15 minutes |
| 3 | Drill holes into the concrete ceiling at the marked points. | Drill, masonry bit | 20 minutes |
| 4 | Install anchors into the drilled holes to secure the fixture. | Anchors, hammer | 10 minutes |
| 5 | Attach the LED batten light to the ceiling using screws. | Screwdriver, screws | 15 minutes |
| 6 | Connect the electrical wiring safely. | Wire strippers, electrical tape | 15 minutes |
| 7 | Test the light to ensure proper installation. | None | 5 minutes |
When mounting LED batten lights on a concrete ceiling, proper positioning is crucial. Begin by measuring the area where the lights will be installed. Identify key focal points in the room. Consider the layout and ambient light required for tasks. Use a chalk line to mark where each light will go. This ensures a straight and level installation.
Next, choose the right mounting hardware. Concrete requires specific anchors designed for durability. Drill pilot holes at the marked positions. Take your time, as uneven holes can lead to misalignment. Additionally, check the positioning after each step. Adjusting now is easier than fixing mistakes later.
It's also important to think about the wire management. Plan how the wiring will run to avoid visible clutter. Use cable clips to keep wires tidy. Reflect on the light spread; avoid placing lights too close or too far apart. Each step in the installation process should be approached with care. Mistakes can lead to poor lighting, impacting functionality. Focus on precision for the best results.
When it comes to securing LED batten lights to a concrete ceiling, several methods can ensure effective installation. The use of expansion bolts is a common choice for concrete surfaces. They provide a strong hold and work well with the heavy weight of batten lights. According to a report by the International Lighting Association, over 45% of LED lighting installations face challenges due to improper mounting techniques. This highlights the importance of using appropriate hardware for installations.
Another reliable method is the use of adhesive anchors. They can offer a less invasive approach compared to drilling. Some adhesives are formulated specifically for concrete, ensuring longevity and a secure fit. However, it’s crucial to follow the manufacturer’s guidelines. Inadequate curing time or improper surface preparation can lead to failures. A joint study from the Concrete Institute revealed that improperly installed fixtures can result in a 30% decrease in lighting efficiency over time.
Consider the weight and placement of your LED batten lights. Ensure your installation area is clean and free from any debris. It's important to examine the concrete ceiling for any cracks or damage that could affect the mounting. Such issues may compromise the stability of your fixtures, demanding a careful evaluation before installation. Choosing the right method not only enhances safety but also ensures optimal performance of your lighting system.
: Assess the area size, lighting needs, and look for energy-efficient models.
It's crucial. Some lights need specific mounting brackets for secure attachment to concrete.
You'll need a drill, concrete screws, anchors, a measuring tape, and a level.
A safety helmet and goggles protect against debris while drilling into concrete.
Yes, practicing on a scrap piece helps gauge drill speed and pressure needed.
Test the lights with a simple connection to confirm they operate properly first.
Choose sleek designs, but don’t sacrifice functionality for aesthetics.
Precise measurements matter. A small mistake can necessitate repositioning later.
Yes, they create a versatile environment and help reduce glare.
Reliable products with good warranties provide peace of mind for long-term use.
Mounting LED batten lights on a concrete ceiling can be a straightforward process when approached methodically. First, it's crucial to select the right LED batten lights suitable for a concrete setting, ensuring they are durable and compatible with the intended space. Gather essential tools and materials like drills, anchors, and clamps to facilitate the installation.
The steps to prepare the concrete surface involve cleaning and prepping the area to ensure a strong bond. Techniques for accurately positioning the lights will help achieve a balanced illumination effect, while securing the lights can be effectively done using methods like drilling anchors or adhesive solutions. This comprehensive guide effectively demonstrates how to mount LED batten lights on a concrete ceiling, making it accessible for anyone looking to enhance their lighting.